Off-Grid essentials
How to Build a Simple DIY Micro-Hydro Power System
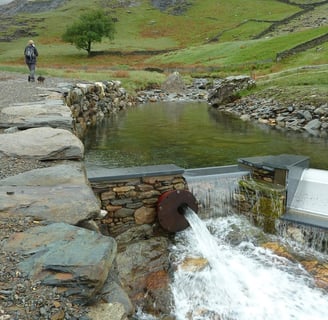
If you have access to a flowing water source, a micro-hydro power system is one of the most efficient and reliable ways to generate electricity off-grid. Unlike solar or wind power, micro-hydro systems provide consistent energy 24/7, making them an excellent choice for off-grid living. This guide will show you how to set up a simple DIY micro-hydro power system to power your off-grid home sustainably.
WATER
11/20/20242 min read

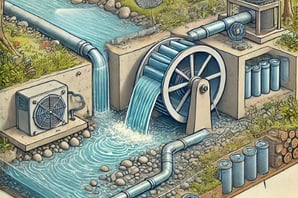
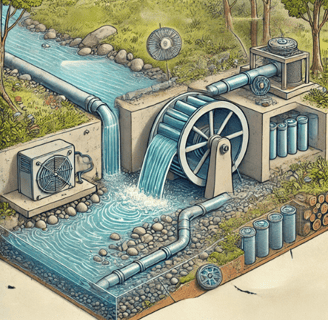
What is Micro-Hydro Power?
Micro-hydro power uses the natural flow of water to spin a turbine, generating electricity. It works best in areas with a consistent water source, like a stream or small river.
Key Components:
Intake: Captures water from the source.
Penstock: A pipe that channels water to the turbine.
Turbine: Spins as water flows through, producing mechanical energy.
Generator: Converts mechanical energy into electricity.
Battery Bank: Stores the electricity for later use (optional for off-grid systems).
Why Choose Micro-Hydro Power?
High Efficiency: Converts up to 90% of water’s energy into electricity.
Low Maintenance: Once installed, micro-hydro systems require little upkeep.
Reliable Power: Operates continuously, unlike solar and wind power that depend on weather conditions.
Eco-Friendly: Produces clean energy with minimal environmental impact.
Steps to Build Your DIY Micro-Hydro Power System
1. Evaluate Your Water Source
Flow Rate: Measure the volume of water flowing per second.
Head (Height Drop): Calculate the vertical distance the water will fall. A higher head produces more energy.
Use a bucket test or a flow meter to measure flow rate and calculate potential power output using this formula:
scss
Copy code
Power (Watts) = Flow Rate (liters/second) × Head (meters) × 9.81 × Efficiency
2. Gather Materials
PVC or Metal Penstock: For channeling water to the turbine.
Turbine and Generator Kit: Available online or from renewable energy suppliers.
Inverter: Converts DC power to AC for household appliances.
Battery Bank (Optional): To store excess energy.
Tools: Wrenches, pipe cutters, and waterproof sealant.
3. Build the System
Create the Intake: Use a screen to prevent debris from entering the penstock. Place it upstream for clean water flow.
Install the Penstock: Secure the pipe to direct water to the turbine. Minimize bends to maintain water pressure.
Mount the Turbine: Position it at the end of the penstock, ensuring the water flows directly onto the turbine blades.
Connect the Generator: Attach the generator to the turbine to convert mechanical energy into electricity.
Set Up Electrical Components:
Connect the generator output to an inverter for AC power.
Optionally, add a battery bank to store excess electricity.
4. Test the System
Run water through the system and monitor the turbine’s rotation.
Check voltage output with a multimeter to ensure it meets your energy needs.
Make adjustments to the penstock or turbine alignment as needed.
Tips for Success
Protect Against Debris: Regularly clean the intake screen to prevent blockages.
Optimize Flow: Use a weir or small dam to direct water efficiently into the intake.
Plan for Maintenance: Install the turbine and generator in an accessible location.
How Much Power Can You Generate?
The power output depends on your water source’s flow rate and head. For example:
Low Head, High Flow: Suitable for systems needing more volume.
High Head, Low Flow: Efficient for smaller systems with steep terrain.
Example outputs:
A stream with 10 liters/second flow and 5-meter head can generate around 490 watts of power.
Challenges to Consider
Seasonal Variations: Water flow may decrease during dry seasons.
Permits: Check local regulations to ensure compliance.
Environmental Impact: Ensure your system doesn’t harm aquatic life or disrupt the ecosystem.
Conclusion
Building a DIY micro-hydro power system is a fantastic way to achieve energy independence off-grid. With the right setup, you can harness the power of water to generate electricity for years to come.