Off-Grid essentials
How to Build a Rocket Stove: Efficient Cooking Without Electricity
Cooking off-grid doesn’t mean sacrificing efficiency or convenience. A rocket stove is a simple, highly efficient, and eco-friendly solution for cooking without electricity. Whether you're living off-grid or preparing for emergencies, a DIY rocket stove can be your go-to option for outdoor cooking with minimal fuel. In this guide, you’ll learn how to build your own rocket stove using basic materials and enjoy the benefits of this innovative design.
SURVIVAL
11/21/20242 min read
What is a Rocket Stove?
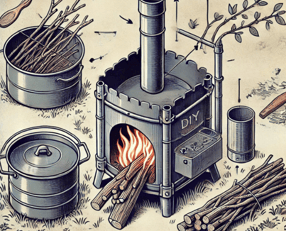
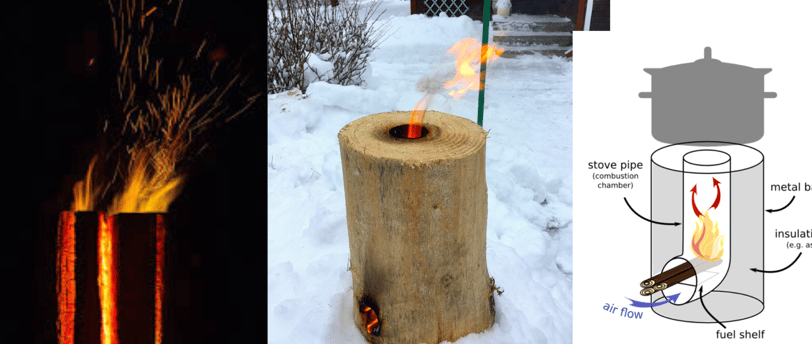
A rocket stove is a portable cooking device designed to maximize fuel efficiency and heat output. It burns small sticks or biomass to produce a high, concentrated flame. The unique "L-shaped" design improves combustion by directing airflow and keeping the fire burning hot.
Why Choose a Rocket Stove?
Fuel Efficiency: Uses small amounts of wood, twigs, or biomass for cooking.
Eco-Friendly: Burns cleanly, reducing smoke and environmental impact.
Portable: Lightweight and easy to transport, ideal for off-grid or outdoor use.
Cost-Effective: Can be built with inexpensive or recycled materials.
Materials Needed for a DIY Rocket Stove
Here’s what you’ll need to build a basic rocket stove:
Metal Can or Bucket: A large coffee can, paint bucket, or similar metal container.
Smaller Metal Pipe: For the vertical chimney section.
Elbow Joint Pipe: Creates the L-shape for airflow.
Insulating Material: Sand, ash, or perlite to fill around the pipes.
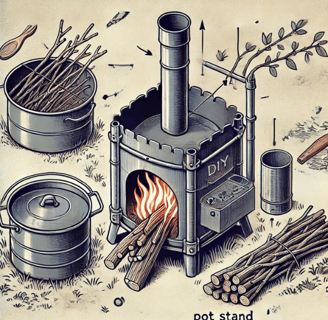
Grate or Pot Stand: To hold your cooking pot above the flame.
Tools: Tin snips, pliers, and a drill.
How to Build Your Rocket Stove
Step 1: Prepare the Container
Choose a sturdy metal container as the outer structure of your stove.
Cut a hole near the bottom of the container for the horizontal pipe. This will be the feed for sticks or biomass.
Step 2: Assemble the L-Shape
Attach the elbow joint to the horizontal pipe and connect it to the vertical chimney pipe.
Fit the L-shaped pipe assembly into the container, ensuring the chimney pipe extends above the container's top.
Step 3: Add Insulation
Fill the container around the pipes with insulating material, such as sand or perlite. This helps retain heat and ensures efficient combustion.
Step 4: Install the Pot Stand
Place a metal grate or stand on top of the chimney pipe to support your cooking pot or pan.
Step 5: Test Your Stove
Place small twigs or dry biomass in the horizontal feed pipe and light the fire.
Check the flame's strength and adjust the airflow by adding or removing fuel.
Tips for Efficient Use
Use Dry Fuel: Wet wood produces more smoke and burns less efficiently.
Avoid Overloading: Feed small amounts of fuel to maintain a consistent flame.
Monitor Airflow: Ensure the chimney pipe remains unobstructed for proper ventilation.
Benefits of Cooking with a Rocket Stove
Faster Cooking: The concentrated flame heats pots quickly, saving time.
Versatility: Suitable for boiling, frying, or simmering.
Emergency Preparedness: Provides a reliable cooking method during power outages or natural disasters.
Upgrades for Advanced Designs
Add a Secondary Air Intake: Improves combustion efficiency.
Build with Bricks or Clay: Creates a permanent and durable rocket stove for outdoor kitchens.
Incorporate a Heat Exchanger: Captures excess heat for other uses, like heating water.
Conclusion
A rocket stove is an essential tool for off-grid living, camping, or emergency preparedness. Its simplicity, efficiency, and eco-friendliness make it a valuable addition to any sustainable lifestyle. By building your own rocket stove, you’ll enjoy the satisfaction of creating a practical and reliable cooking solution.